Database branching workflow primer
An introduction to integrating Postgres branching into your development workflow
With Neon, you can work with your data just like you work with your code. The key is Neon's database branching feature, which lets you instantly create branches of your data that you can include in your workflow, as many branches as you need.
Neon branches are:
- Isolated: changes made to a branch don't affect its parent.
- Fast to create: creating a branch takes ~1 second, regardless of the size of your database.
- Cost-effective: you're only billed for unique data across all branches, and they scale to zero when not in use (you can configure this behavior for every branch).
- Ready to use: branches will have the parent branch's schema and all its data (you can also include data up to a certain point in time).
Every Neon branch has a unique Postgres connection string, so they're completely isolated from one another.
# Branch 1
postgres://database_name_owner:AbC123dEf@ep-shiny-cell-a5y2zuu0.us-east-2.aws.neon.tech/dbname

# Branch 2
postgres://database_name_owner:AbC123dEf@ep-hidden-hall-a5x58cuv.us-east-2.aws.neon.tech/dbname
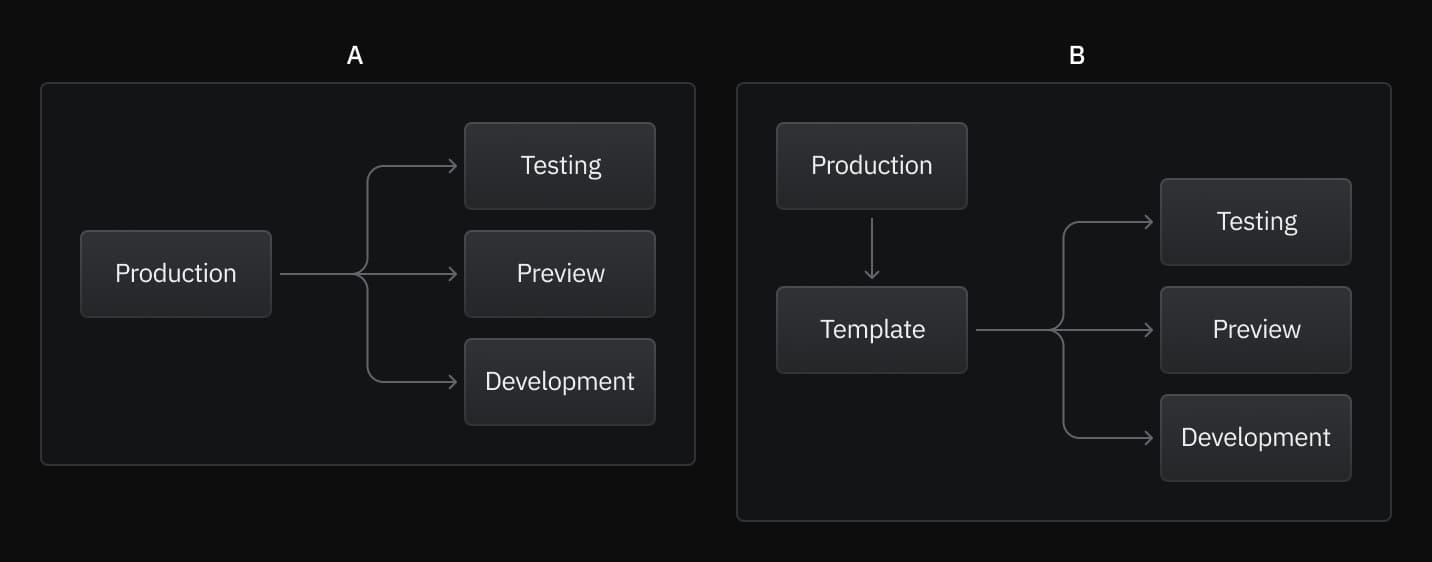
You can create all of your branches from the default branch, or set up a dedicated branch that you use as a base. The first approach is simpler, while the second provides greater data isolation.

Create branch methods
You can use either the Neon CLI or GitHub actions to incorporate branching into your workflow.
Neon CLI
Using the Neon CLI, you can create branches without leaving your editor or automate branch creation in your CI/CD pipeline.
And here are the key CLI actions you can use:
# Create branch
neonctl branches create [options]

# Get Connection string
neonctl connection-string [branch] [options]

# Delete branch
neonctl branches delete <id|name> [options]
For more information, see:
Branching with CLI
Learn about branching with the Neon CLI
CLI Reference
Reference for all commands in the Neon CLI
GitHub Actions
If you're using GitHub Actions for your CI workflows, Neon provides GitHub Actions for creating and deleting branches.
Here is an example of what a create branch action might look like:
name: Create Neon Branch with GitHub Actions Demo
run-name: Create a Neon Branch 🚀
jobs:
  Create-Neon-Branch:
    uses: neondatabase/create-branch-action@v4
    with:
      project_id: rapid-haze-373089
      parent_id: br-long-forest-224191
      branch_name: from_action_reusable
      api_key: {{ secrets.NEON_API_KEY }}
    id: create-branch
  - run: echo project_id ${{ steps.create-branch.outputs.project_id}}
  - run: echo branch_id ${{ steps.create-branch.outputs.branch_id}}
You can find these GitHub Actions here:
Create branch Action
Create Neon Branch with GitHub Actions Demo
Delete branch Action
Delete Neon Branch with GitHub Actions Demo
For more detailed documentation, see Automate branching with GitHub Actions.
A branch for every environment
Here's how you can integrate Neon branching into your workflow:
Development
You can create a Neon branch for every developer on your team. This ensures that every developer has an isolated environment that includes schemas and data. These branches are meant to be long-lived, so each developer can tailor their branch based on their needs. With Neon's branch reset capability, developers can refresh their branch with the latest schemas and data anytime they need.
tip
To easily identify branches dedicated to development, we recommend prefixing the branch name with dev/<developer-name> or dev/<feature-name> if multiple developers collaborate on the same development branch.
Examples:
dev/alice dev/new-onboardingPreview environments
Whenever you create a pull request, you can create a Neon branch for your preview deployment. This allows you to test your code changes and SQL migrations against production-like data.
tip
We recommend following this naming convention to identify these branches easily:
preview/pr-<pull_request_number>-<git_branch_name>Example:
preview/pr-123-feat/new-login-screenYou can also automate branch creation for every preview. These example applications show how to create Neon branches with GitHub Actions for every preview environment.
Preview branches with Fly.io
Sample project showing you how to create a branch for every Fly.io preview deployment
Preview branches with Vercel
Sample project showing you how to create a branch for every Vercel preview deployment
Testing
When running automated tests that require a database, each test run can have its branch with its own compute resources. You can create a branch at the start of a test run and delete it at the end.
tip
We recommend following this naming convention to identify these branches easily:
test/<git_branch_name-test_run_name-commit_SHA-time_of_the_test_execution>The time of the test execution can be an epoch UNIX timestamp (e.g., 1704305739). For example:
test/feat/new-login-loginPageFunctionality-1a2b3c4d-20240211T1530You can create test branches from the same date and time or Log Sequence Number (LSN) for tests requiring static or deterministic data.
Last updated on